Saturday, October 29, 2011

Blog Candy! Blog Candy! Blog Candy!!!!!

Oh boy do I have a treat for you!
I have a pack of Stampin' Up!'s bEAutiFUL Flirtatious Designer Series Paper for TWO yes, 2 winners!!!!!! (I used this paper all through my Inkin' Cute Craft Room and LOVE it!!!)

How do you win it you might be asking yourself? Sign up as a follower to my blog AND leave a comment on THIS post telling me what your fav part about my new Inkin' Cute Craft Room is. If you are already a follower of my blog all you have to do is leave a comment.

I will choose the winners on Thursday November 3rd. That give you almost a week to sign up and leave your comment.

I can't wait to hear what you have to say!
xoxoxo-Heather

"Create"

Stampin' Up! has the best variety of Vinyl home decor! I love this particular one for my Inknin' Cute Craft Room. It was easy to apply and was even easier to punch it up even more with some of Stampin' Up!'s adorable ribbon. I can't wait to share with you all of the things that I still have yet to create in my new Inkin' Cute Craft Room!
xoxoxo-Heather

My Inkin' Cute Craft Room Display Boards

My goal in my Inkin' Cute Craft Room is to have plenty of inspiration for me and my customers throughout the space. I love these boards because they allow me to showcase multiple cards. I love this shelf that I got at a big box store years ago. I originally purchased two of them, but one got damaged in the move (Pretend there are two of them). Each cubby hole has a basket or mini drawer that holds items that are smaller and are easy to lose track of.
The Memo boards were very simple to create:
I covered a piece of cardboard with very thin Quilting batting and the hot glued Stampin' Up!'s Flirtatious Fabric over it (the pieces weren't large enough to cover the space I wanted so I sewed two pieces together).
I laid the ribbon out the way I wanted it and the stuck brads through all of the layers. I used the piercing tool to put a hole in it before I put the brad in.
I glued the ends of the ribbon on the back and the put it in a frame!
This is a super inexpensive way to make your own board and make it the size you want!!!

xoxoxo-Heather

My Inkin' Cute Craft Room Big shot/cutting area

This is probably the area in my Inkin' Cute Craft Room that I am the most excited about....and will take the most imagination on your part.... I am not done with it yet!
This is my Big Shot and Cutting Station.
I plan on having a desk custom built for the space so I can sit and prep for classes, cut with my paper trimmer and Big Shot things until my heart is content!!!.
The bars that I have my punches on will stay where they are, I love how well organized they are and right where I can just grab them.
Right above the punch racks we are going to put in some shelving that I can put my Big Shot die boxes on.
I got these pencil holders at a local dollar store and added my own little touch with some pieces I cut out with the Island Floral Big Shot Die. They already have holes in them, so it was very simple to attach the flowers to them with a rhinestone brad.

xoxoxo-Heather

My Inkin' Cute craft room Shelves

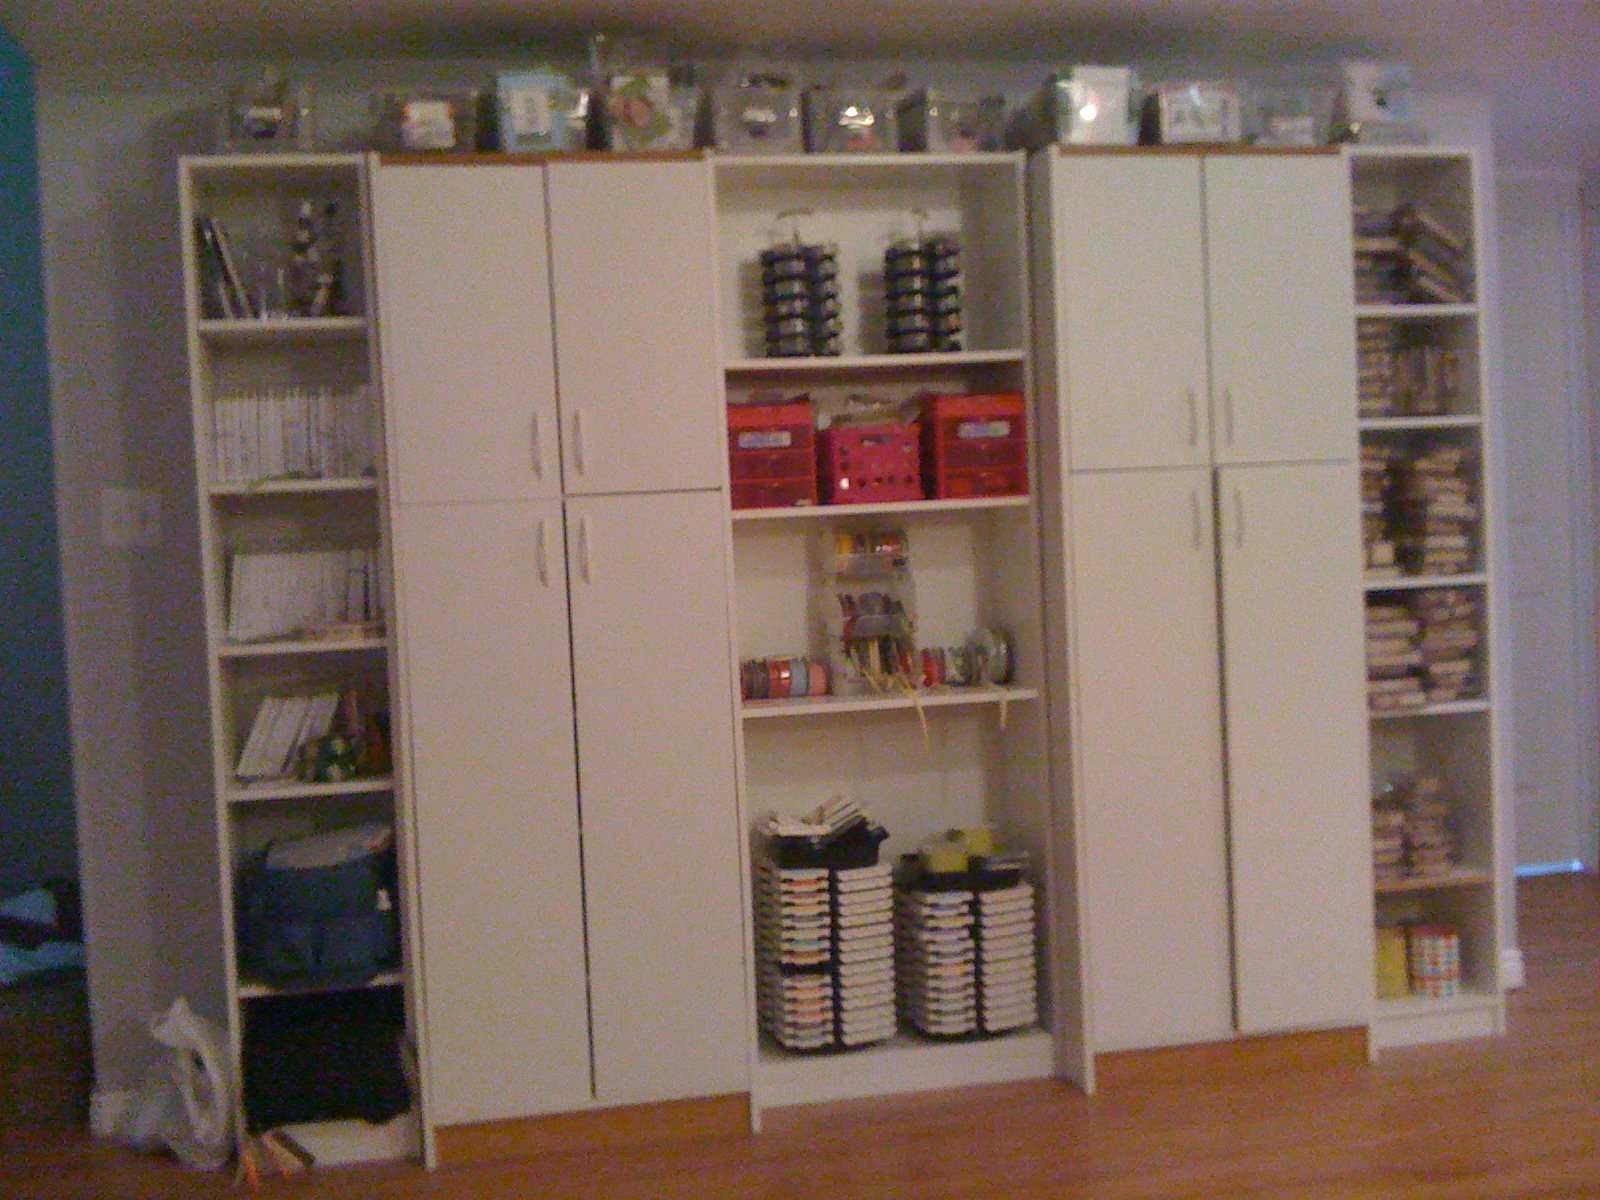
Here we go...... My Inkin' Cute Craft Room is done!!!! I showed you the shelves after we got them in, but you have not seen what I put in and on them. So the next SEVERAL posts will show you my shelving, storage, decorating and much more. I hope you enjoy the tour.

This is the shelving unit as a whole. The two cupboard style ones were gifts to me after my hubby graduated with his masters... a reward for supporting him through the long schooling process. Anyone who has been a student wife knows it is not an easy accomplishment!!! The open shelves were sort of inherited with the house we just moved into...... I can't believe how well they work with the ones I already had. I seriously think they look like a matching set.
I use the far left one for all of my clear stamp storage. I love how compact the cases are and how easy it is to store. I also have the bags that I pack for workshops stored on the bottom two shelves.
Inside the cupboards are not so pretty....just a heads up, that's what doors are for right? I have a basket with my adhesives and all of the stampin' wheels and handles on the top shelf. The other shelves have prospective projects..... wreaths, books to cover, baby food jars etc....
On the center portion of my shelving I have my accessory caddies on top. On the shelf just below I keep my sponges and sponge daubers in the little pink drawers. In the pink basket I have my accessories that don't have containers to fit in the accessory caddy.
Somehow I lost my ribbon holders in the move, so they are just lined up on the shelf.
Last I have my ink pad holders

We are now on to the other cupboards. Once again..... I love that they close.
The top two are project that I am in the process of working on or are waiting to go to a great hostess!
Under those I have all of my sewing things....Material, needles, sewing machine etc. I love having an actual place to store my sewing machine. In my apartment it sat on my craft table and found a temporary home in my bedroom when I had classes and workshops.
The last portion is my wood stamp sets. They are a bit more bulky, however I love the wood sets for the ones my kids stamp with. They are always knocking the clear stamps off the blocks!
On top of my shelving I store all of my cards I have made, and my card swaps from demonstrator events. I love having a stockpile of cards to choose from when I am in need of that perfect card.
xoxoxo-Heather

My Inkin' Cute Craft Room Couch

In my apartment my craft area was in my living room. The space was crowed, but I loved having a place where my husband and/or children could sit and talk with me comfortably while I created. I am so fortunate to be able to have my own space while still enabling my family to visit with me during my crafting time.
It is funny how one mans junk is another mans treasure. My friend/downline Erika was going to get rid of this couch, seeing as how it didn't work in her place anymore. I jumped at the chance to take it off her hands! It is smaller than a regular love seat but larger than a chair. It even has a pull out bed (a small one anyway).
This couch was the first thing that was moved into my craft room after the floor was put in. Here is a pic of me and my little girl chillaxin'.

I think it is VERY obvious that I am a tad bit fond of the Flirtatious Designer Specialty Fabric that Stampin' Up! sells. I sewed four of the fat quarters together to make each panel of my curtains. You can hardly see the seems because they are gathered.
I covered the pillows with the same fabric. I got the idea from another Super talented demonstrator Mandy Erickson. She gave instructions for them, but I am not one for patterns so I figured it out by the measurements of my pillow.
The flowers were cut out using the Island Floral die (I used it on a lot of the projects in my craft room). I layered them and hand stiched them together while gathering and puckering them. I used liquid stitch to adhere them to the pillow.
The little pillow is copied directly from a display I saw at Convention......one of the MILLIONS of perks of being a demonstrator. I used liquid stitch to adhere the ribbon that wraps around the pillow. With the stripped ribbon I used my sewing machine to put a running stitch down the edge of it and the pulled and gathered it. Once the ribbon was gathered I tied a knot in one end, put some liquid stitch on it and pinned that right to the center. I circled the ribbon around the knot adhering it with liquid stitch along the way and using pins to hold the ribbon in place while the liquid stitch dried.
Here is a close up of the rosette. I had not taken the pins out yet.
I hope you are liking my Inkin' Cute Craft Room as much as I am!!!
xoxoxo
-Heather

My Inkin' Cute Craft room Business Supply area

This is the little space I have set aside for my Business Materials (Catalogs, order forms, invites etc....) Of course What would a Stampin' UP! business Supply area be if I didn't "Stampify" a little bit? I found this little Pigeon hole shelf at a Garage sale.... Actually an "After Garage Sale" they were packing everything up to go to the second hand store and said I could take what I wanted. I walked away with a TON of free stuff. All this little baby needed was a new coat of paint and it makes the perfect little display!!!
This lamp was salvaged from a sweet lady who passed away in my old neighborhood.
This is what it looked like when I stated. It is hard to tell with the lighting, but it was a dark blue before I spray painted it black.
I made the flowers with ....you guessed it.......the Island Floral Big Shot die. I layered the pieces together and used clear rhinestone brads to stick it right to the lampshade. The brads did a wonderful job of piercing the lampshade on their own.

xoxoxo-Heather

My Inkin' Cute Craft Room Fireplace

When we first decided to use this room as my Inkin' Cute Craft Room I was not too excited about the fireplace. I could think of a million things I would rather do with the wall space.
That is until I was given the idea for a wow topiary! After that I was all over having a place to showcase TWO of them!
I know, I know, I know....the vinyl is retired! I bought it way back when with the intention of using it in my house someday. That someday is here! The wreath is made with the Flirtatious Designer Series Paper as well as each topiary.


xoxoxo-Heather

My Inkin' Cute Craft Room Display Hutch

My sweet friend Liz was redecorating her living room and asked if I wanted this china cabinet. I of course said YES!!! It was a dark brown when I got it, so we put a coat of white paint on it and antiqued it a bit. I am happy with the way it turned out.
I had been looking for something for a while to display some projects that I had created or received from other very talented demos.
I don't change the displays out as often as I should, but I love the creative flare it adds to the whole room.
xoxoxo-Heather

My Inkin Cute Craft Room Paper Storage

I think you Might notice that I love me a good bargain! I have been very fortunate to be able to find such great items to make my Inkin' Cute Craft Room just the way I want it! This Display with paper shelves was a display at a craft store that went out of business (lets face it no craft store can be as awesome as Stampin' UP!) They were selling all of their paper racks and displays at crazy prices. I was just looking for a paper rack, but the manager told me that I could have the center display for free if I purchased both of the paper shelves that match.
I am sure my husband thought I was crazy for buying it seeing as how it took up almost an entire wall in our apartment living room.

It wasn't until we moved to our house that I have been able to use the display portion as display rather than storage. I thought it would be a great place to showcase my Artisan Award entries (not the actual ones, but the doubles I made).
xoxoxo-Heather

My Inkin' Cute Bathroom

I know I showed you the bathroom towels I made for the bathroom in my Inkin' Cute Craft Room. Now you get to see the whole thing. The sink area doesn't have any Stampin' Up! stuff, but it matches everything else so I am showing it to you.Here are the towels I made. I used the Flirtatious fabric in strips on the bottoms.

This Shower curtain is one that I am Super proud of!!!! I purchased two clear curtain liners from a local dollar store. I also got the pick curtain rings from the dollar store.
I cut the flowers out with the Island Floral Big shot die (I LOVE this die). I then layered the fabric flowers and connected them with a rhinestone brad. The brad poked right through one of the Shower curtain liners attaching them to the liner. After the flowers were attached to one curtain liner I hung both liners up back to back. This will hide the back of the brads from the inside of the shower.
I attached the flowers in a pattern to look like they were flowing out of the shower head.

xoxoxo-Heather

Friday, October 28, 2011

Magnetic Christmas Countdown Calendar!

Magnetic Christmas Countdown Calendar!

We are finally to the project this month on www.craftProjectCentral.com that I designed! Get the full instructions by subscribing to October.

xoxoxo-Heather

Wednesday, October 26, 2011

La La La La, La La La La............. Elmo's Card!

My sweet Niece turned two recently. As many two year old children, she has a SLIGHT obsession with Elmo. I couldn't resist the urge to make a card that would get her as excited as her presents.
The Big Shot makes the process of creating this card so easy I almost feel like I am cheating!!!
Easy, yet SOOOOO cute!

Needless to say she loved the card (many adults were impressed as well)!
xoxoxo
-Heather

Flirtatious Gift Packaging Ensemble!

Flirtatious Gift Packaging Ensemble!

I love this project!!! Subscribe to October @ www.craftprojectcentral.com to get the instructions for this fun set created by Sharon Field at www.createdBYu.blogsopt.com

xoxoxo-Heather

Monday, October 24, 2011

French Foliage Folio Set

French Foliage Folio Set

This stunning set of cards was created by Lynn Weiss at www.LWdesigns.blogspot.com check out more projects at www.CraftProjectCentral.com

xoxox-Heather

Friday, October 21, 2011

Christmas Tree Pyramid Box & Card!

Christmas Tree Pyramid Box & Card!


Cute little packages tied up in string – these are some fun holiday things! This little Christmas tree pyramid box

is a sweet way to package small little treats or trinkets for the holidays – and when you open it up, the sides can

unfold flat and make a pretty display. The matching card completes your gift ensemble with just a touch of

Glimmer Paper bling and country charm with the Cherry Cobbler Baker’s Twine.

Check it out at www.craftprojectcentral.com

and see more by Rose Diehl at www.RoseMarieDiehl.blogspot.com

xoxoxo-Heather

Monday, October 17, 2011

Spooky Banner

I received a call from a Concept Artist at Stampin' Up! a couple weeks ago asking me to create a Halloween project for the Artisan Album on Stampin' Up!'s very own Facebook page. I was given a week to create it and give them the supply list. Here is what I came up with....


Spooky Banner Supply list

123754 Piece of Poison stamp set

118592 Tiny Tags stamp set

113439 Big Shot die cutting machine

115950 Scallop Square bigz clear die

113464 Serif Essentials Alphabet bigz die

122334 Simply Scored scoring tool

119860 1-3/8” Circle Punch

117190 Jewelry Tag Punch

119873 ¾” Circle Punch

101227 1/16” Circle Handheld Punch

108362 Crop-A-Dial

101179 Basic black Classic Stampin’ Pad

105216 Pumpkin pie Classic Stampin’ Pad

105117 Pumpkin Pie Card Stock

121045 Basic Black Card Stock

100730 Whisper White Card Stock

117157 Neutrals Collection Patterns Designer Series Paper Stack

124005 Silver Glimmer Paper

119962 Basic Black 3/8” Taffeta Ribbon

109030 Pumpkin Pie ¼” Grosgrain Ribbon

114320 On Board Sheets

124262 White Baker’s Twine

118763 Mini Vintage Tags

124116 Mini Jingle Bells

104332 SNAIL adhesive

104430 Stampin’ Dimensionals

104294 Sticky Strip

104152 Paper Cutter

108360 Craft Scissors

The plan is for all ten of us to regularly have projects posted on the page throughout the next little while.
xoxoxo-Heather