Showing posts with label Stampin' Up fabric. Show all posts

Saturday, October 29, 2011

My Inkin' Cute Craft Room Display Boards

My goal in my Inkin' Cute Craft Room is to have plenty of inspiration for me and my customers throughout the space. I love these boards because they allow me to showcase multiple cards. I love this shelf that I got at a big box store years ago. I originally purchased two of them, but one got damaged in the move (Pretend there are two of them). Each cubby hole has a basket or mini drawer that holds items that are smaller and are easy to lose track of.
The Memo boards were very simple to create:
I covered a piece of cardboard with very thin Quilting batting and the hot glued Stampin' Up!'s Flirtatious Fabric over it (the pieces weren't large enough to cover the space I wanted so I sewed two pieces together).
I laid the ribbon out the way I wanted it and the stuck brads through all of the layers. I used the piercing tool to put a hole in it before I put the brad in.
I glued the ends of the ribbon on the back and the put it in a frame!
This is a super inexpensive way to make your own board and make it the size you want!!!

xoxoxo-Heather

My Inkin' Cute Craft Room Couch

In my apartment my craft area was in my living room. The space was crowed, but I loved having a place where my husband and/or children could sit and talk with me comfortably while I created. I am so fortunate to be able to have my own space while still enabling my family to visit with me during my crafting time.
It is funny how one mans junk is another mans treasure. My friend/downline Erika was going to get rid of this couch, seeing as how it didn't work in her place anymore. I jumped at the chance to take it off her hands! It is smaller than a regular love seat but larger than a chair. It even has a pull out bed (a small one anyway).
This couch was the first thing that was moved into my craft room after the floor was put in. Here is a pic of me and my little girl chillaxin'.

I think it is VERY obvious that I am a tad bit fond of the Flirtatious Designer Specialty Fabric that Stampin' Up! sells. I sewed four of the fat quarters together to make each panel of my curtains. You can hardly see the seems because they are gathered.
I covered the pillows with the same fabric. I got the idea from another Super talented demonstrator Mandy Erickson. She gave instructions for them, but I am not one for patterns so I figured it out by the measurements of my pillow.
The flowers were cut out using the Island Floral die (I used it on a lot of the projects in my craft room). I layered them and hand stiched them together while gathering and puckering them. I used liquid stitch to adhere them to the pillow.
The little pillow is copied directly from a display I saw at Convention......one of the MILLIONS of perks of being a demonstrator. I used liquid stitch to adhere the ribbon that wraps around the pillow. With the stripped ribbon I used my sewing machine to put a running stitch down the edge of it and the pulled and gathered it. Once the ribbon was gathered I tied a knot in one end, put some liquid stitch on it and pinned that right to the center. I circled the ribbon around the knot adhering it with liquid stitch along the way and using pins to hold the ribbon in place while the liquid stitch dried.
Here is a close up of the rosette. I had not taken the pins out yet.
I hope you are liking my Inkin' Cute Craft Room as much as I am!!!
xoxoxo
-Heather

My Inkin' Cute Bathroom

I know I showed you the bathroom towels I made for the bathroom in my Inkin' Cute Craft Room. Now you get to see the whole thing. The sink area doesn't have any Stampin' Up! stuff, but it matches everything else so I am showing it to you.Here are the towels I made. I used the Flirtatious fabric in strips on the bottoms.

This Shower curtain is one that I am Super proud of!!!! I purchased two clear curtain liners from a local dollar store. I also got the pick curtain rings from the dollar store.
I cut the flowers out with the Island Floral Big shot die (I LOVE this die). I then layered the fabric flowers and connected them with a rhinestone brad. The brad poked right through one of the Shower curtain liners attaching them to the liner. After the flowers were attached to one curtain liner I hung both liners up back to back. This will hide the back of the brads from the inside of the shower.
I attached the flowers in a pattern to look like they were flowing out of the shower head.

xoxoxo-Heather

Thursday, September 15, 2011

September Hostess Club Project

I am so excited about this months hostess club project, not just because it is Freakin' Cute, but it is also the VERY first project I created in my new Inkin' Cute Stamp Studio!!!
I focused on the holiday mini seeing as how it just came out this month, and really what is not to LOVE?

The accordion medallion was created using the new SIMPLY SCORED and Stampin' Up's SPICE CAKE Designer Series Paper both of which were just introduced in the new mini.
I covered the More Mustard circle with DAZZLING DETAILS creating a luscious bling!
I tore a one inch strip of the SPICE CAKE designer Fabric to go through one of the holes, down under the box of crayons, up and out the other hole that had been punched with the crop-a-dial and then tied a knot at the top. Now when you pull on the fabric the box will pop up and reveal the fun surprise that the cardstock is hiding. Notice that you don't have to know how to sew to use the adorable fabric Stampin' Up! has to offer? It makes a great substitute for ribbon!
I chose the Family Reunion stamp set, so my customers could choose the word or sentiment they want stamped across the front.
xoxoxo,
Heather

Friday, September 2, 2011

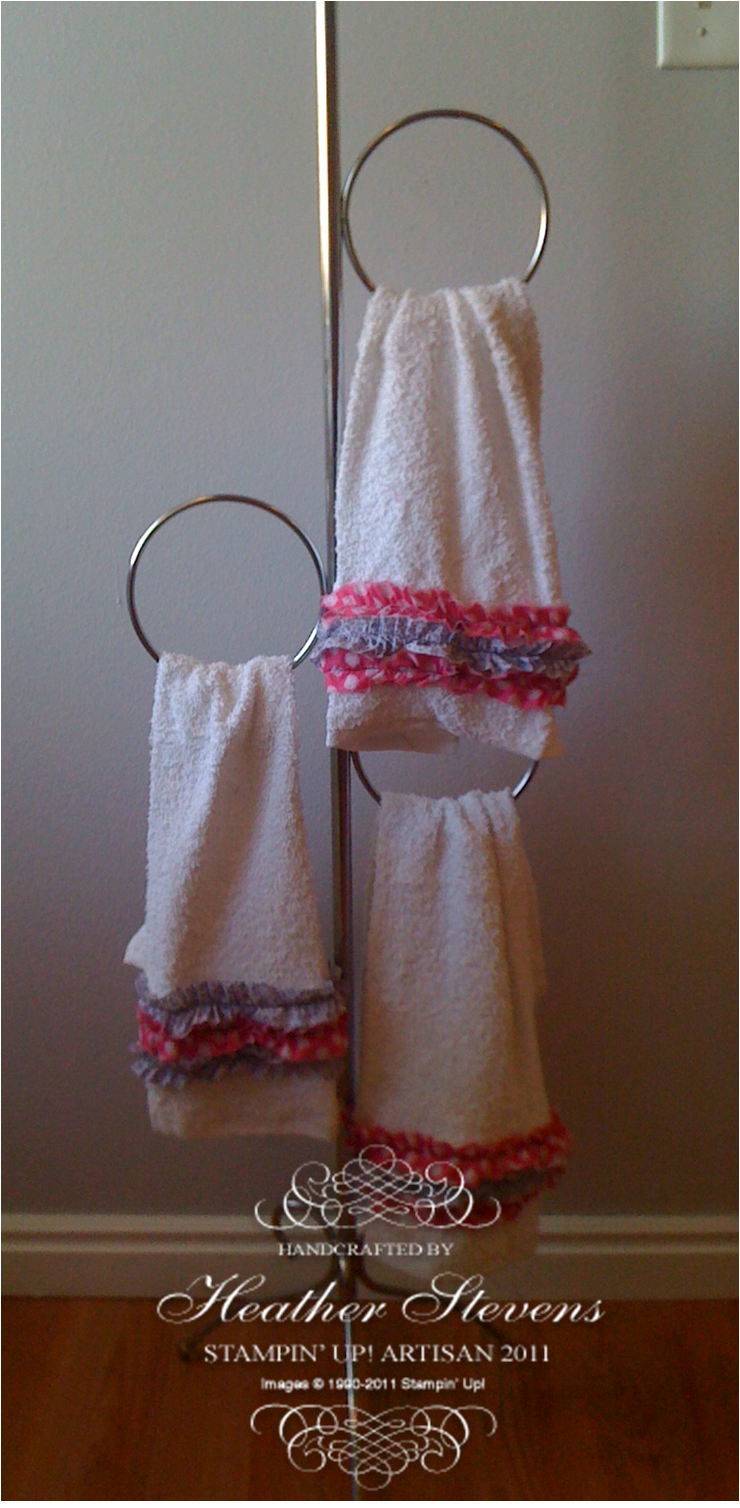
Craft bathroom towels

In keeping with the towel theme I am showing off the towel display from the bathroom connected to my craft room. I love the way this bathroom is turning out. I am using the Flirtatious Designer Series Paper and Fabric to decorate my craft room, so I took the theme and ran with it while decorating the bathroom.
I used the same towels as the other bathroom. Instead of ruffled ribbon on the bottom I ruffled strips of Stampin' Up!'s designer fabric along the tan stripes. I would love to take credit for this idea myself but it is straight from a convention display. One more reason to be a demonstrator.......tons of ideas!!
I found the towel rack at a garage sale, I do love me a good bargain.

We are getting close to the end result of my very own craft room. I can't wait to share it with you!!!
xoxoxo
-Heather

Monday, August 29, 2011

Connie Collins flip flops and Thank You Card

You will be able to tell from this post that Connie Collins is a wonderful woman who goes above and beyond the call of duty. Connie is the one who organized the Artisan Award Winners Blog Hop and she designed all of our watermarks for the hop.
These Stinkin' cute flip flops are made with Stampin' Up!s fabric. Connie removed the plastic "toe things" (Wow....I honestly cannot think of a better name at the moment), and used the Big Shot Fabric Adhesive to iron it right on. YEAH, that is right.....FABRIC WITHOUT SEWING!!!!! I love it!!!
Connie took it to the next level by tying the Striped Melon Mambo bows on them. She made tons of extras as to make sure that everyone would be able to get one in their own size. No way am I putting these on my feet! They are going on display! I am so serious, I even picked a pair to match my (soon to be) Craft Room.
Here is where we see Connie's "above and beyond" come out. She made 2 swaps for us.Connie used the Fun Flowers Big Shot Die to create these spirited flowers. I don't think I could ever stress enough how simple the Big Shot can make crafting. Just run some of Stampin' Up!s designer Series paper through it (you can do 8 layers at a time) and Shazam....you have these!!! I love all the layering on this card. Layering is a great way to give a card a major POW.

See you Tomorrow
xoxoxo
-Heather